Tuesday, October 31, 2017

Reversal Print Progress

Pumpkin003
Never give up. That's good advice for anyone. I learned this lesson just recently, as I'd taken a pause from experimentation with this peroxide/citric acid reversal technique for creating direct positive prints from conventional photo paper.

What I had been doing was mixing the bleaching solution by combining the hydrogen peroxide and citric acid solutions together. I'd tried various concentrations of both but, not really understanding what I was doing, had mixed success; sometimes I'd get good reversal, other times it would take an hour or longer - or the bleaching simply wouldn't happen at all.

At the suggestion of a fellow APUG member (there's a thread on APUG documenting our progress with this new process), I tried separating the two constituent components of the bleaching process into individual trays. I also had a hunch that we'd been using way too much citric acid. So I mixed 1/5 gram (about 1/5 teaspoon) of citric acid powder into 200mL of water for the acid bath; then made a 300mL solution of 9% hydrogen peroxide (by diluting 77mL of 35% peroxide with 223mL of water) for the peroxide bath.

I was able to successfully process eight prints in a row with this batch of chemistry, with negatives exposed in both direct sun and shaded daylight - a far better success rate than I've experienced previously. Here's a synopsis of my process:

*Expose Freestyle Photo's Arista Ultra grade 2 RC paper (semi-matte finish) in-camera at ISO 1.6 (I also tested ISO 0.8, but it appears to be a bit too much exposure).

*First developer: Ilford Multigrade concentrate, mixed 1+15 to 1+20, developed for 1:30. The concentration and strength of the first developer has a lot to do with the overall contrast of the finished print, even with this fixed-grade 2 paper. The negative image on the paper usually appears very dark.

*Rinse: Thoroughly rinse the print in fresh water, to remove residual base-pH developer.

*First Citric Acid bath: process face-up for :30 with gentle agitation, ensuring the paper remains submerged.

*First Peroxide bath: process face-up for 2:00, ensuring the paper remains submerged. Avoid excess contact of paper surface with tongs. Gently press paper down with rubber tip of tong to ensure paper remains submerged. Avoid excess agitation. After about 1 minute the image will begin to reverse, with a sabbatier or solarization effect visible, as the darker tones (representing the image highlights) begin to fade. The fading or bleaching will slow or cease.

*Second Citric Acid bath: process face-up for :30 with gentle agitation, ensuring the paper remains submerged. The image should slightly fade even more, as the carry-over peroxide mixes with the fresh citric acid.

*Second Peroxide bath: process face-up for 2:00, ensuring the paper remains submerged. Avoid excess contact of paper surface with tongs. Gently press paper down with rubber tip of tong to ensure paper remains submerged. Avoid excess agitation. Most of the remaining darker tones should fade to near paper-white, with only a few areas of slight gray remaining. Total bleaching time is 5:00.

*Rinse: Thoroughly rinse residual peroxide solution from paper under running water.

*Fogging Exposure: Expose the remaining silver halides in the paper emulsion under enlarger, set to 16" height and f/22 aperture, for :15.

*Second Developer: Process for 1:30-2:00 in same developer solution as first developer.

*Stop Bath: Process for :30 in acetic acid or white vinegar stop bath solution (i.e. standard paper stop bath).

*Fixer: Process for 2:00 in standard paper fixer solution.

Complete the processing by a rinse aid and a 10 minute rinse, then squeegee and heat dry the print with a clean, dedicated hair dryer.

Processing the paper in separate bleaching solutions using this two-step technique seems to consistently produce a reliable bleaching of the darker tones after the first developer step. Careful monitoring of the image as it bleaches is helpful; some subtle moving of the print in the peroxide bath seems to help, but too much agitation is to be avoided. The process seems to require a specific technique to master. Gently and slowly pushing the paper down into the solution as it tends to float to the surface is important, as the peroxide solution seems to stratify as it's used.

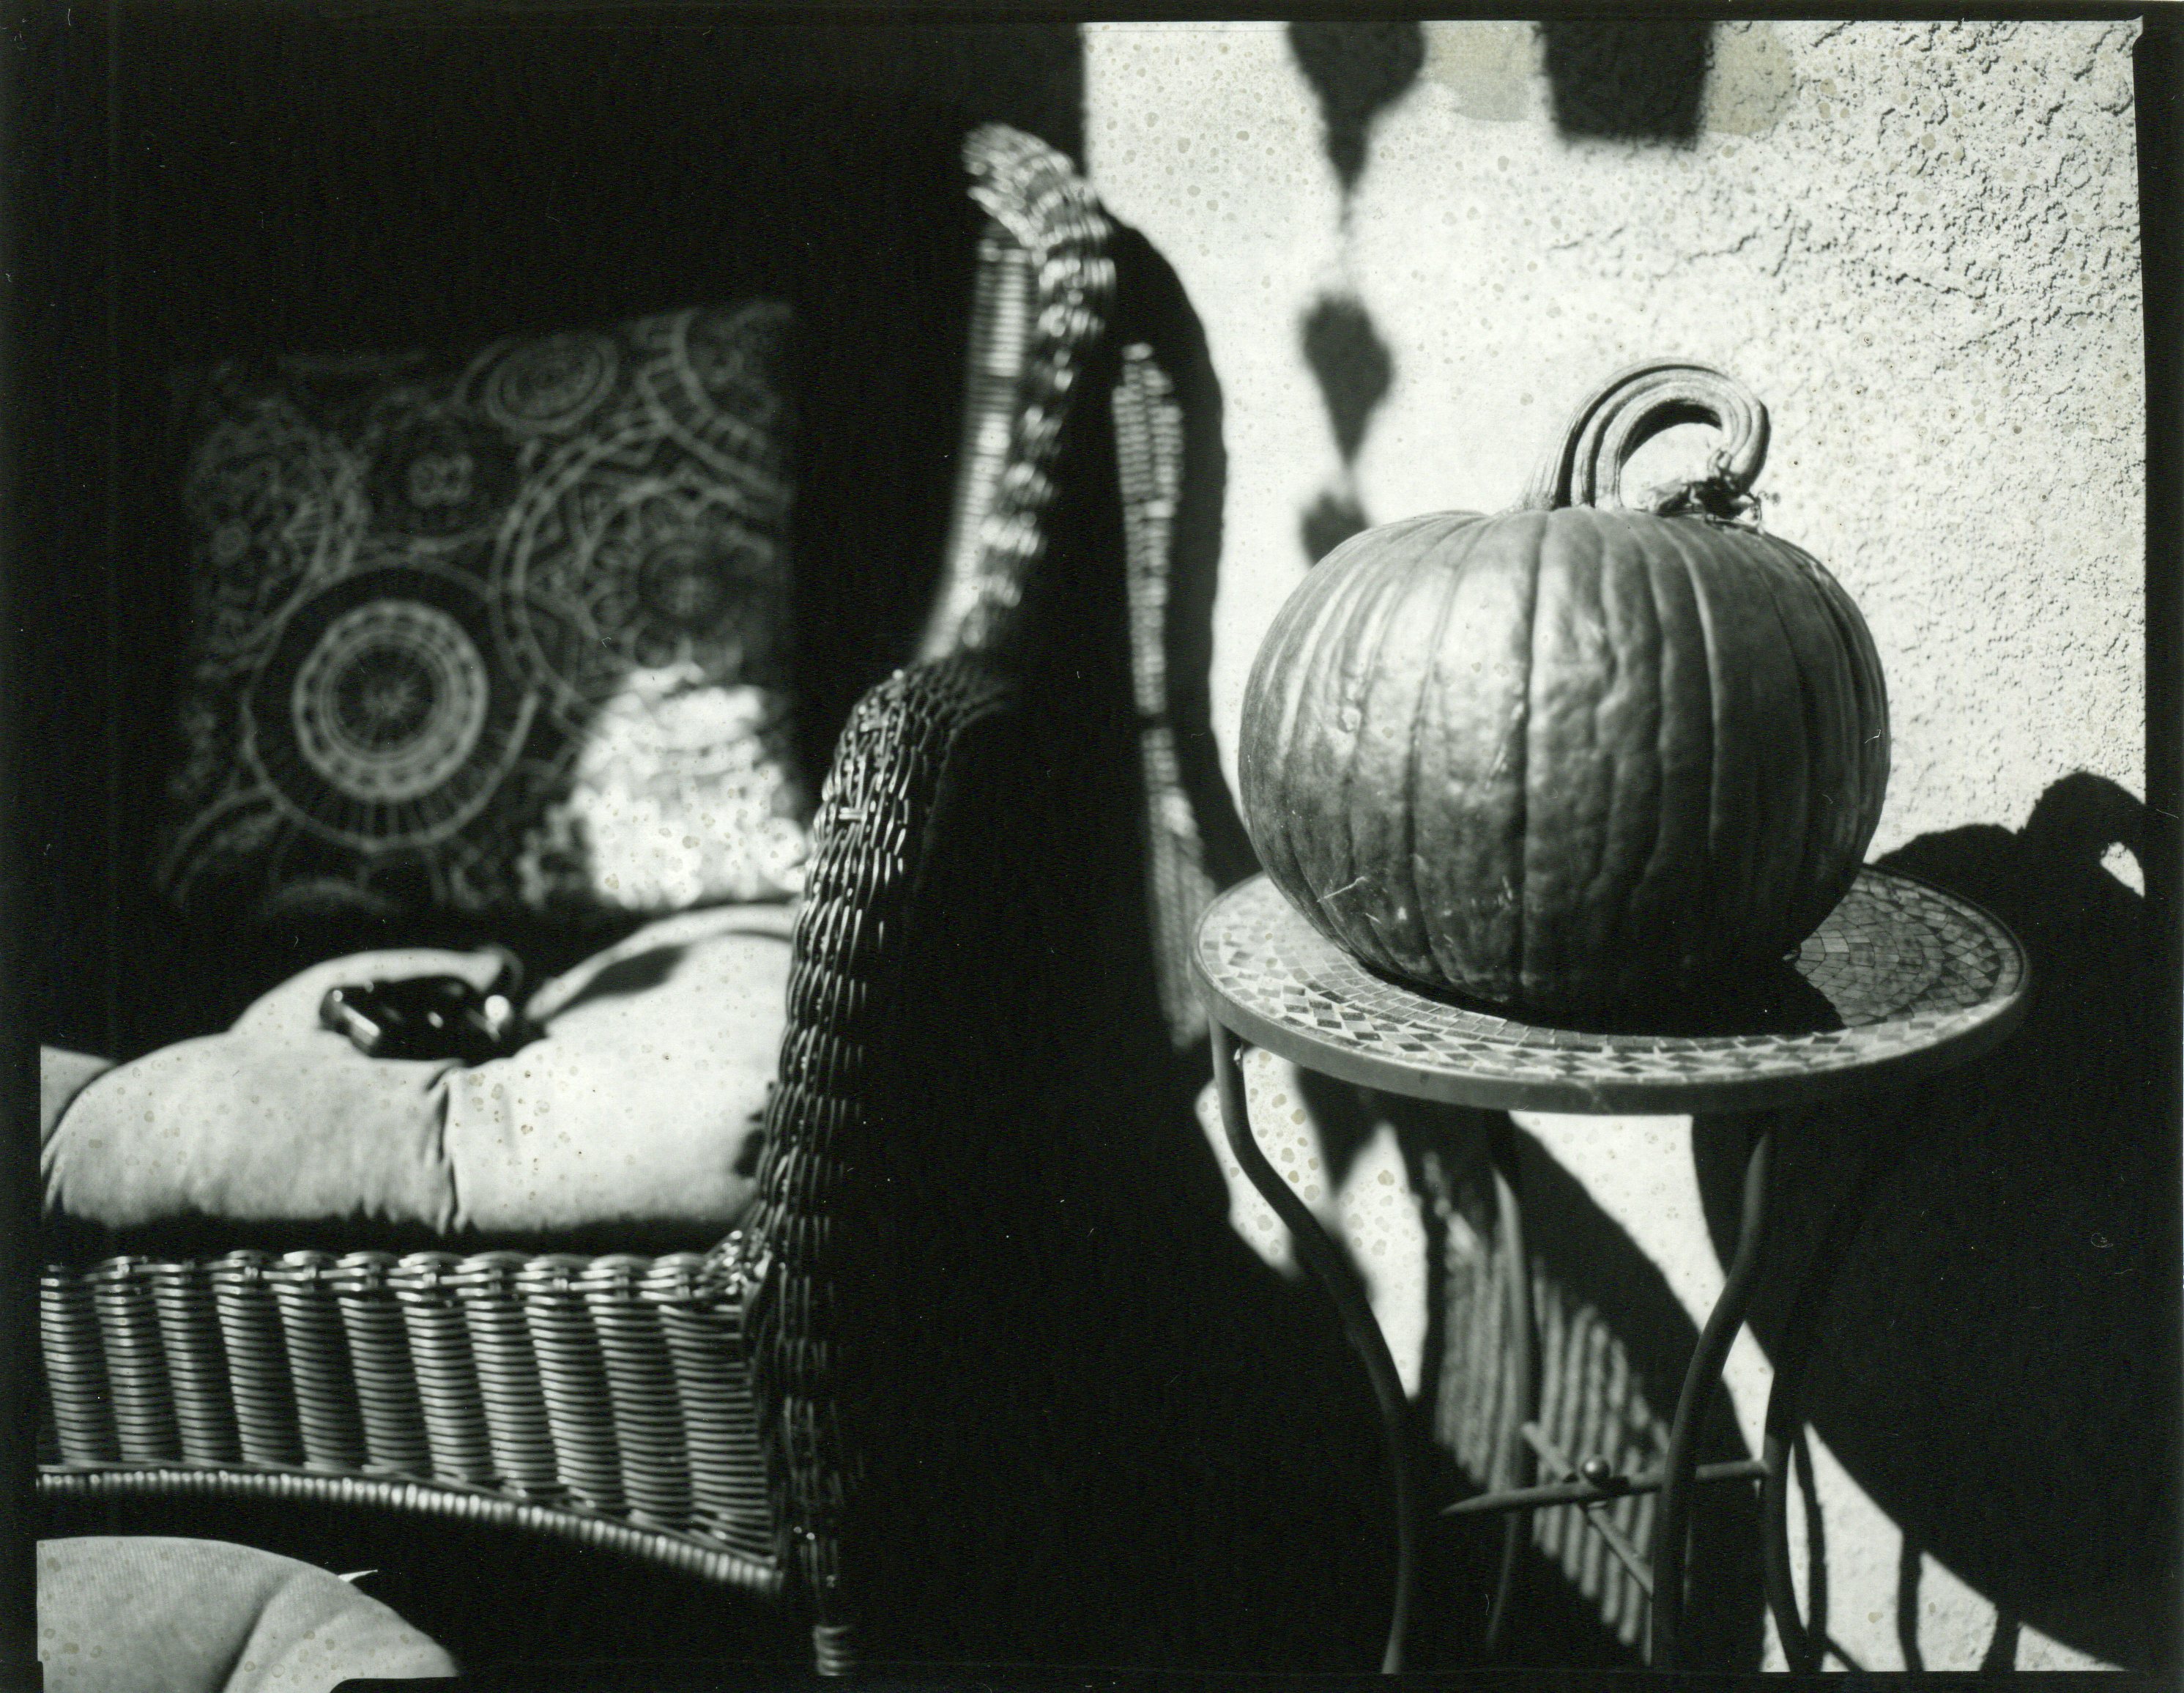
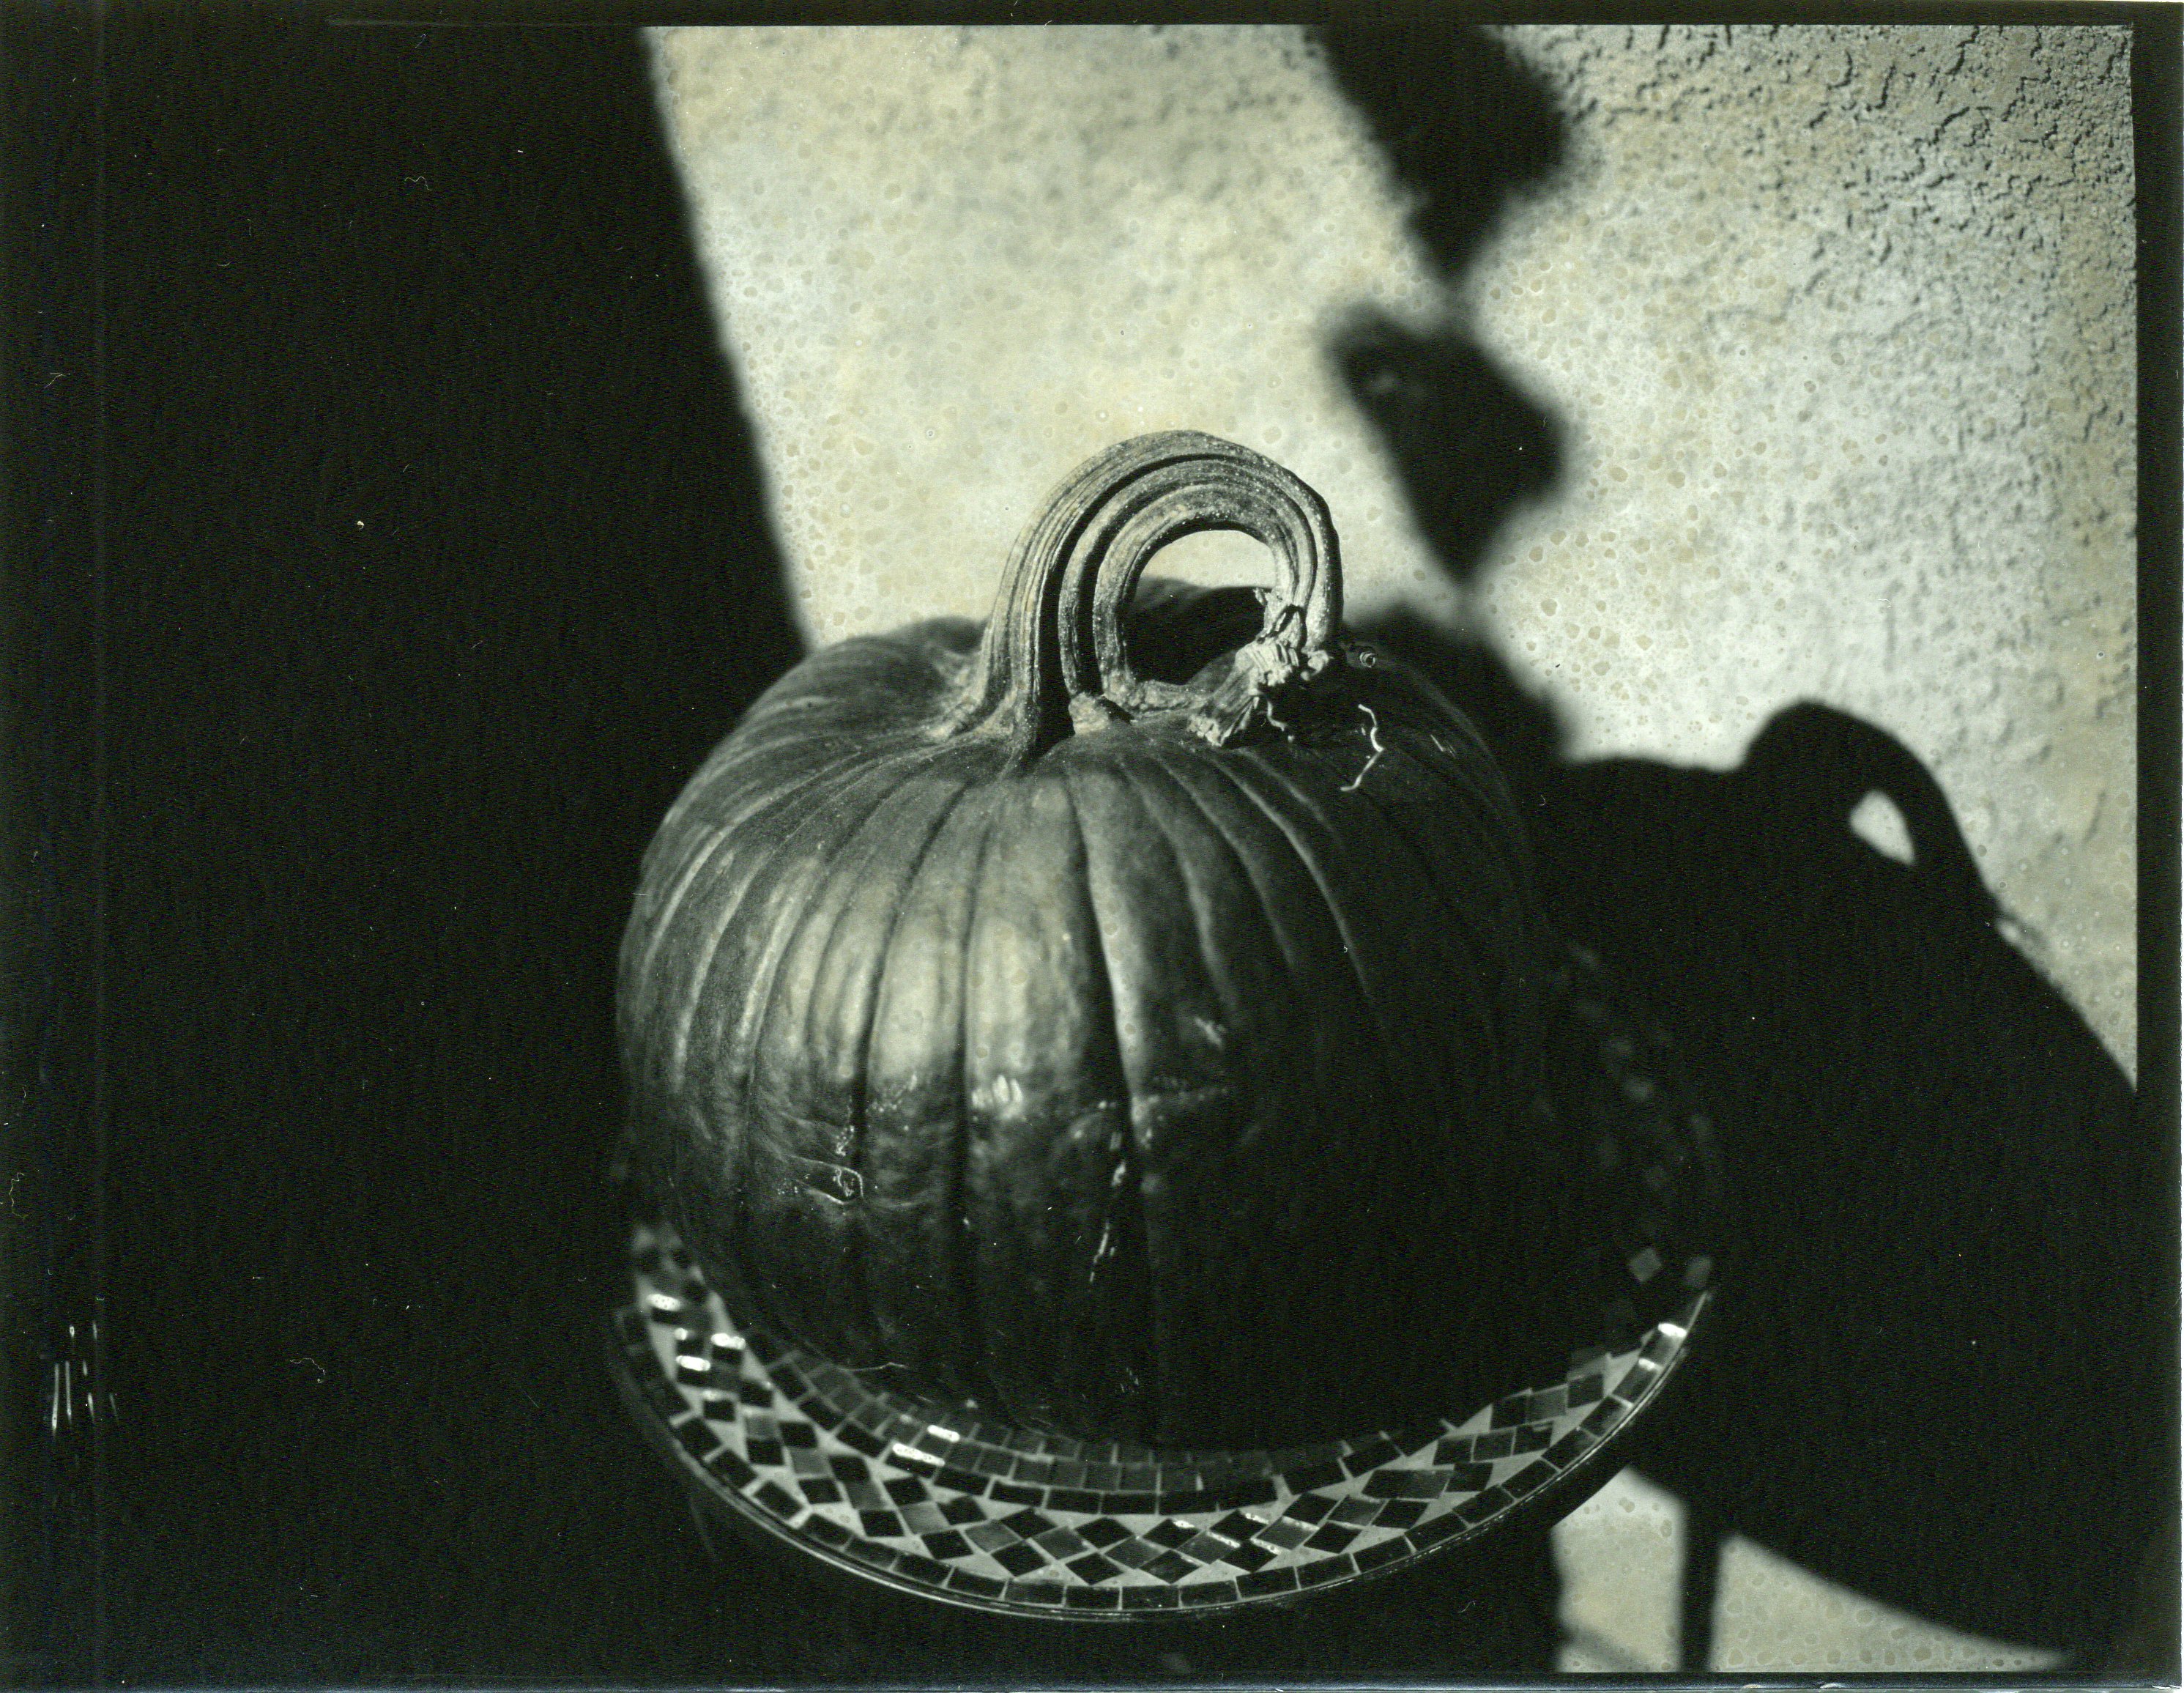
The one remaining process issue left to resolve are little spots, that I call "freckle defects," that seems to happen on brightly exposed highlights, and more near the edges of the print than the center. This might be an indication of excessive exposure; or insufficient bleaching. More experimentation is needed.

I intend on repeating this same technique time and again, to verify its consistency, before scaling up the image size to 8"-by-10".
Pumpkin002

Pumpkin001

Joe002
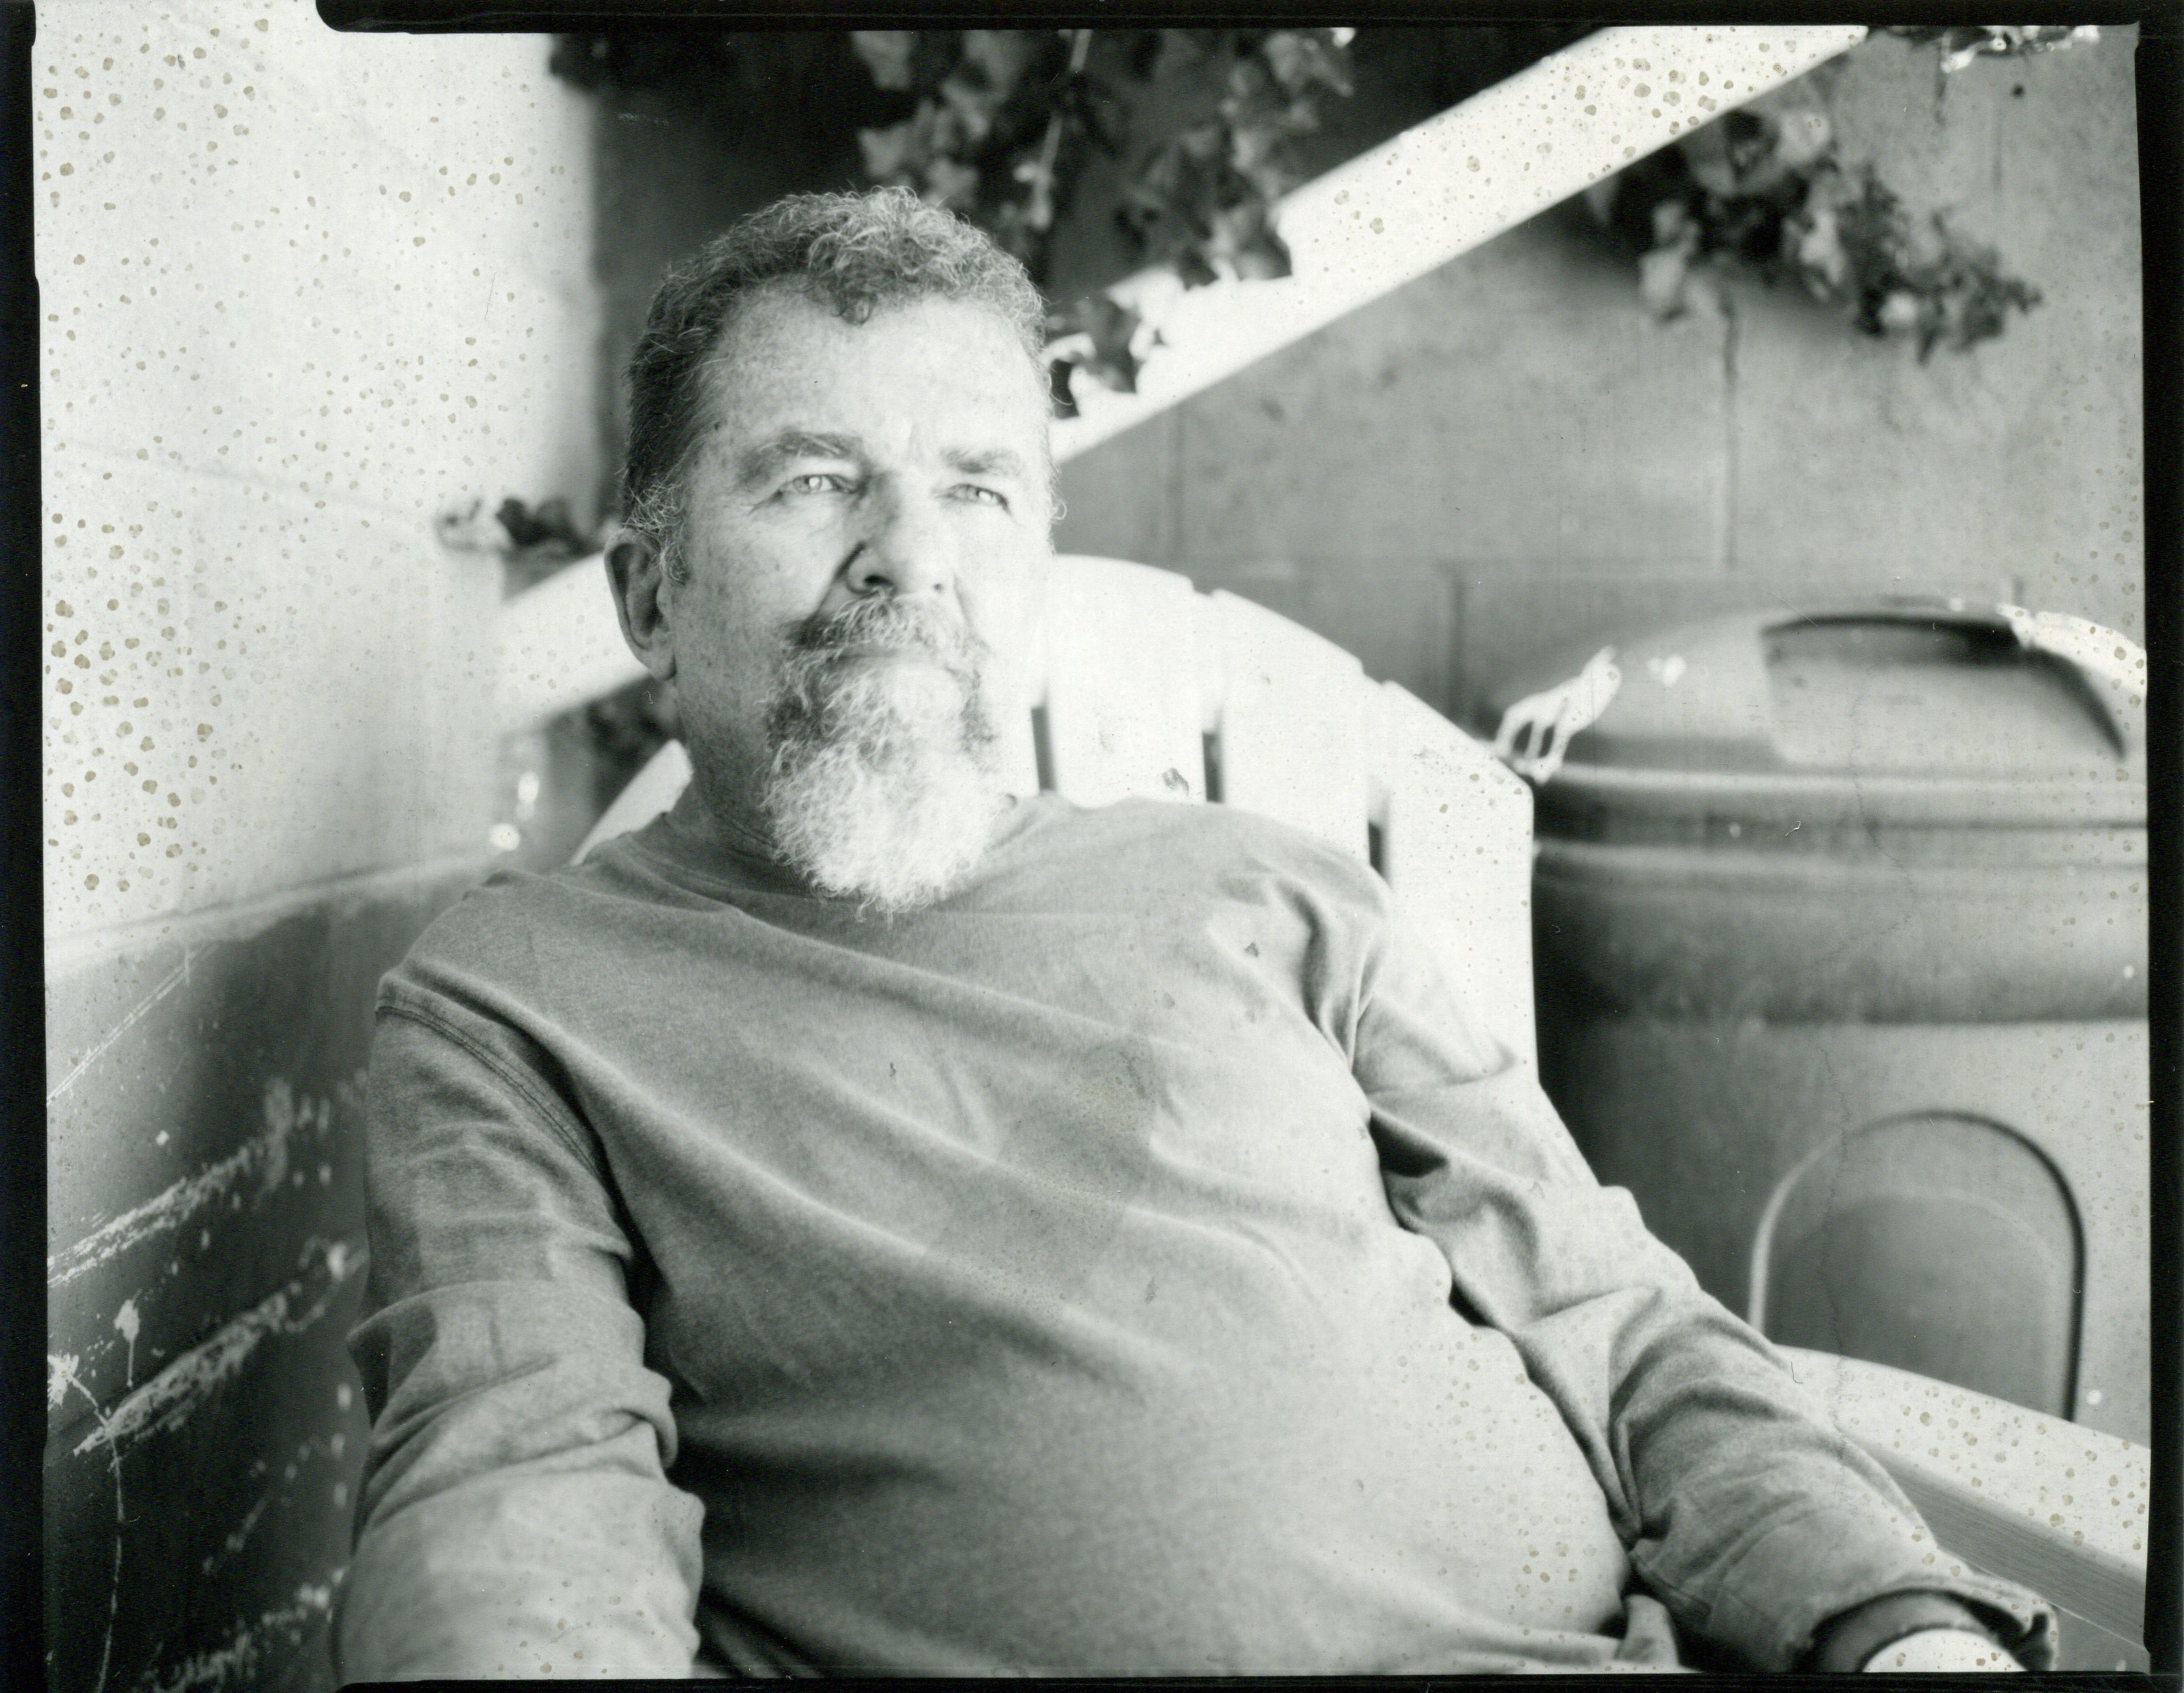
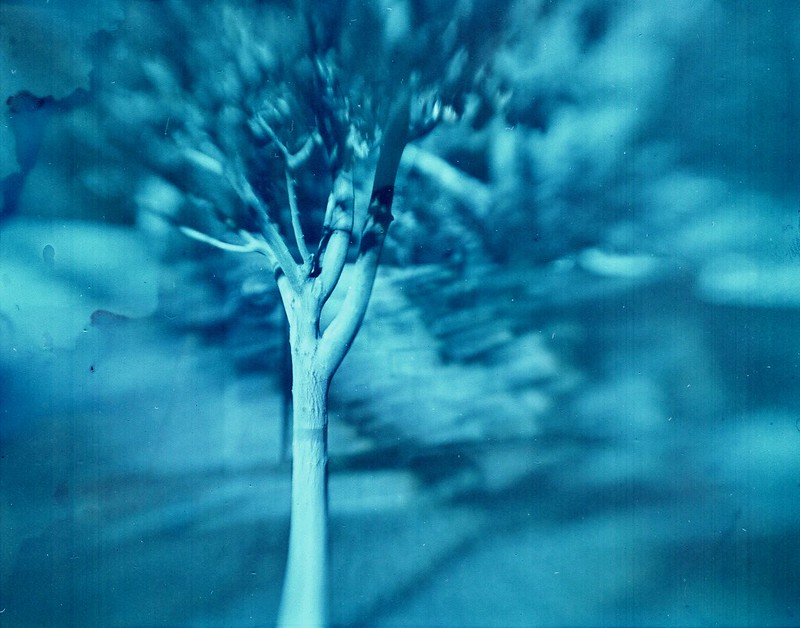
Excess exposure at ISO 0.8. Note too the freckle defects in the highlights.

Joe003
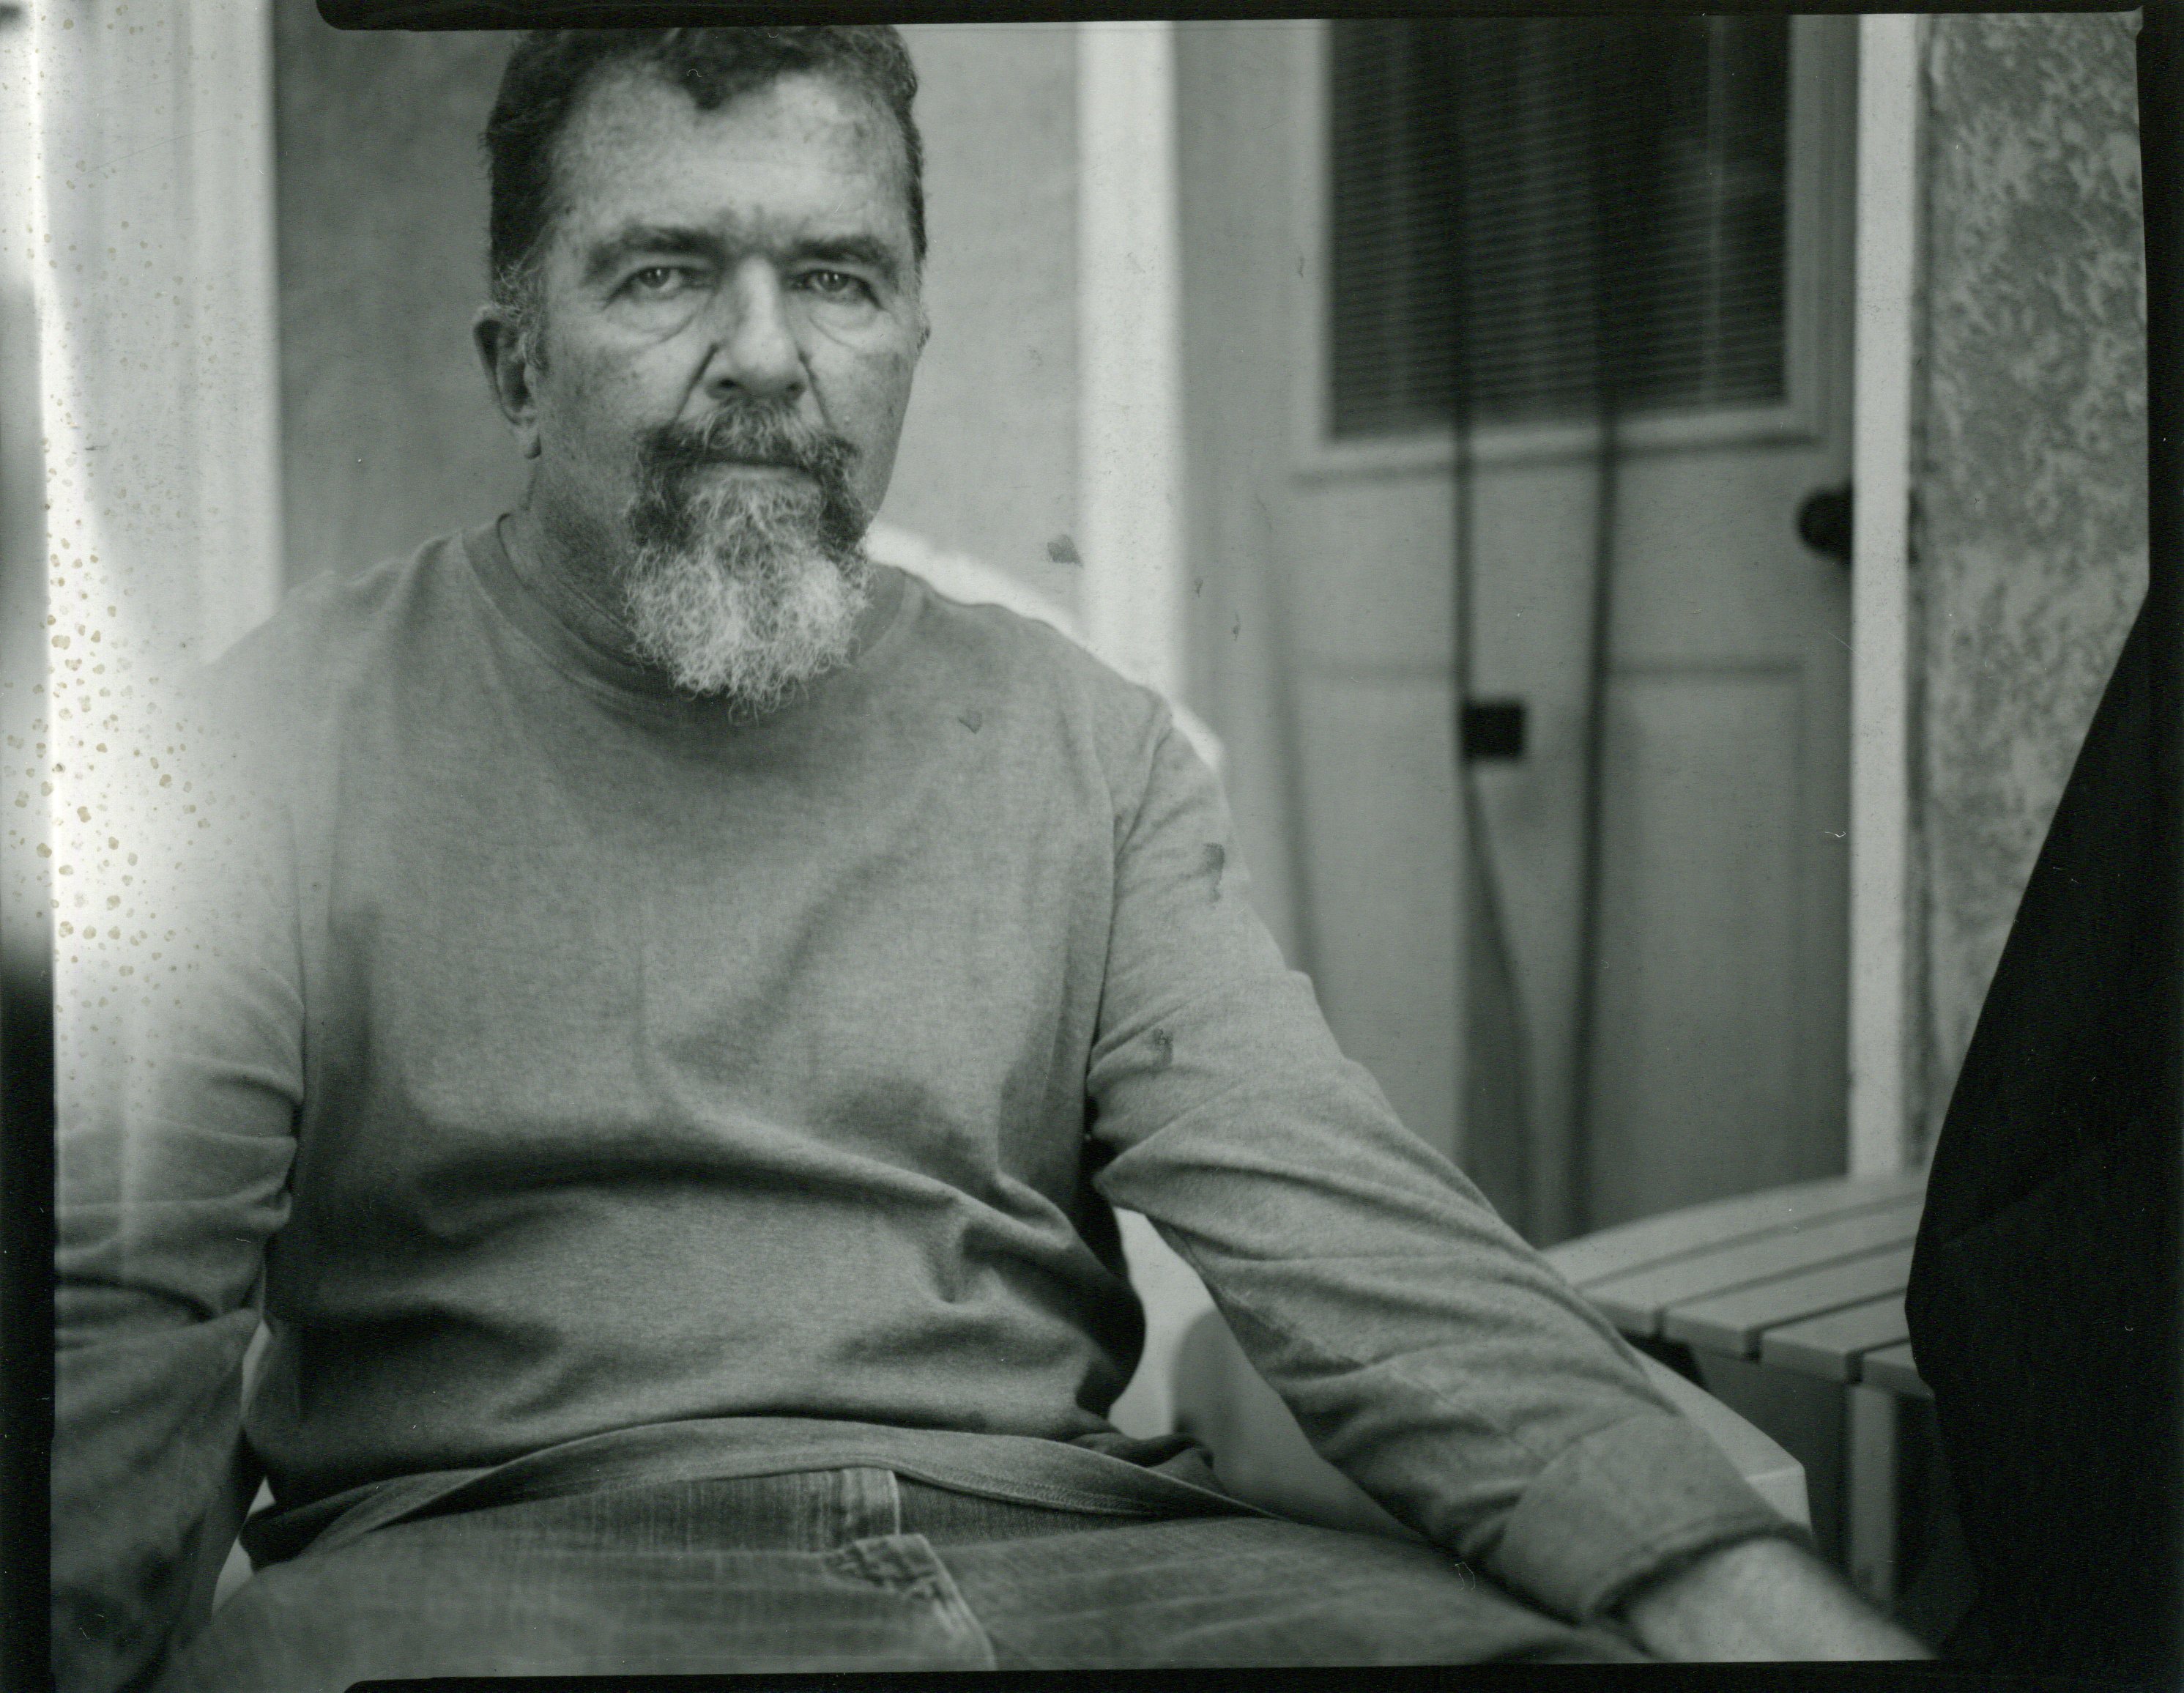
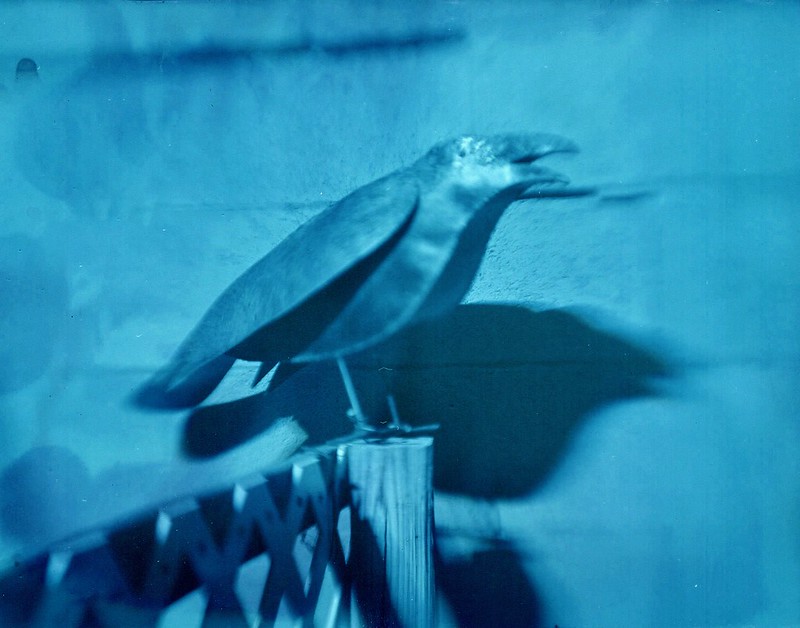
Here I reduced the exposure using ISO 1.5, but a light leak resulted from a wonky film holder. Note the freckle defects are only evident at this highlight area of fogging.

Labels:

Thursday, October 26, 2017

Lumen Print Camera Build


The last few weeks have seen me struggling to achieve consistent results with an experimental method of reversal processing black & white photo paper, using a mixture of hydrogen peroxide and citric acid as a bleaching agent. As interesting as that is, the lack of consistent results has me temporarily seeking solace in another experimental photographic technique, one that seems in comparison much easier to tame: lumen prints - technically a paper negative image created by the auto-development action of light itself against grains of silver halides, no chemical processing required.

Lumen prints have been created by artists and other creatives for many years, often using a pinhole camera placed outdoors, pointed at the sky, recording over a long period of time the path of the sun. But using the lumen print process to create more conventional photographs is a bit more esoteric. Just the thing to interest me.

I first heard of this by way of Jorge Otero, a lumen print artist and purveyor of nice wooden lumen print cameras he calls Lumenbox, on Etsy. I wrote a blog article about him recently.

This week I decided to make a more serious lumen camera besides the crude cardboard, duct tape and plastic fresnel lens camera I'd cobbled together earlier. The process requires a fast lens, in order to shorten the othewise lengthy exposure time as much as possible. I looked through my assortment of optics and decided, for an approxiamate 4x5 sized image, that only two lenses would suffice: an improvised binocular lens, of 150mm focal length and a wide-open aperture of f/3; and the original lens to my Speed Graphic camera, the Kodak Ektar 127-f/4.7.

I decided to experiment with the binocular lens on the Speed Graphic, while at the same time I was cobbling together a camera for the Ektar lens. The exposure times used with this process are often 20-30 minutes in bright sun, slow enough to permit me to also work on the camera while shooting some footage for a documentary video on the subject. The binocular lens has a relatively sharp central portion of its image, with the rest all a mess of swirly and cloudy artifacts. Artsy might be a good description. While the Ektar lens is clinically sharp, center to edge.

I had considered building a camera from scratch, but then looked at the stack of pinhole cameras accumulating in one corner of my darkroom. I decided on a wooden craft box, purchased some years ago from Hobby Lobby and made into a pinhole camera, might fit the bill. It had about the required size and the sturdiness of wooden construction over many of my other cameras that are built from foam core board.

I drilled a hole in the front of the box big enough for the Ektar lens, then proceeded to figure out how best to mount it. It turns out that the box would be a bit too deep for achieving infinity focus with the lens mounted to the front, so I had to resort to mounting the lens inside the front of the box, mounted backwards to gain access to the shutter. A sliding section, made from salvaged foam core board and hot glue, made for a convenient focusing method. The lid of the craft box fits snuggly over this sliding section. I'm using a thin sheet of lucite plastic, sanded smooth on the front side, as a makeshift focusing screen for the camera. I remove the back, focus and compose, then the camera is ready to receive paper.

After a first abortive attempt at making an exposure, in which the paper slipped off the rear flange of the sliding section, I modified it with a thicker flange surface, necessitating a smaller film format size, just about 4" square. A piece of craft paper, taped to the bottom of the flange, serves to hold the bottom edge of the paper in place when loading the camera. It's all experimental, this cobbled-together camera, and will most likely require modifications going forward.

This lumen process is a bit non-intuitive. It uses light-sensitive paper, but because chemical developers are not used, relying instead solely on the auto-development action of light against silver halides, the paper can be handled under subdued lighting with little concern for fogging the paper. Being as Jorge Otero has discovered the process works faster when the paper is wetted with water, I simply took the rear box of the camera into the dark room, cut a sheet to size, wetted it, then carried the paper through the house to the front porch, where the camera was situated already focused on the subject. I then loaded the paper directly into the box, in bright daylight. And waited. For about an hour - I wanted to ensure good first results.

The auto-development process produces a color change with silver gelatin paper. I'm not enough of a scientist to understand the details, but do know that there are various types of silver halides used in these printing papers, and have seen various tones of browns, yellows, pinks and purples result, depending on the intensity and color of light. Experiments I did last week, using grade 2 paper, fell flat on producing good results; this process requires a high-contrast emulsion, which multi-grade paper provides. I'd advise anyone interested in this process to use both a fast lens, and multigrade paper, pre-wetted with water.

Once exposed, the paper negatives are still light-sensitive. So it's best to store them in some light-proof envelopes or sleeves. I made some crude sleeves from black craft paper and gaffers tape, but there's probably a better solution out there.

This is a hybrid process. To produce a usable image, scanning the negatives and entering into a digital work flow is mandatory; unless the negatives themselves are treated as some esoteric form of fragile paper art object, viewed under subdued lighting. I scan them, then invert the tones to produce a positive. In doing so, the colors also invert, from the warm tones mentioned earlier into blues and greens. One can also convert the image to monochrome and dispense with the color. Personally, I'm a bit torn on which to do. I really like Otero's resulting monochrome images, but there remains something intriguing about the resulting colors that has me interested. In the last image I created yesterday, the inverted positive has blue skies and green leaves on the tree. Weird. Almost like a color process, but I know just enough to know that ain't so. Still, when you see green leaves resulting from black and white paper, it makes you stop and think.

My old flatbed scanner is less than optimal for this process. And I lack completely a photographic quality printer. But this process has me interested in creating fine prints that will do this process justice. More experiments are in order. Best of all, this process is pure fun. With just a bit of waiting time thrown in. Just enough time to sit down at the typewriter and ponder.

Tree Test001 (1)
1 hour exposure on Ilford multigrade paper. 150mm-f/3 binocular lens on Speed Graphic.

Raven Test001 (1)
1 hour exposure on Ilford multigrade paper. 150mm-f/3 binocular lens on Speed Graphic.

House Test001 (1)
1 hour exposure on Ilford multigrade paper. Kodak Ektar 127-f/4.7 lens in Cinema Lumen Box camera.

Labels: ,

Monday, October 23, 2017

November ABQ Type-Out!!

Nov2017TypeOut

Hear ye, hear ye! The Rio Grande contingent of the Typewriter Revolution is announcing a Type-Out, on Sunday, November 12, 2017, at Pennysmiths Paper, 4022 Rio Grande Blvd, NW. Nestled in the historic north valley of Albuquerque near the Rio Grande, we'll be setting up tables under the covered portico in front of Pennysmiths Paper. Bring your own typewriter (and a chair), or try out some from our own collection. Refreshments can be had at Flying Star Cafe; paper and supplies at Pennysmiths; and Tom Hanks' book at Bookworks, all adjacent to the Type-Out. Maybe bring a jacket; we haven't yet been able to predict the weather, despite our best efforts.

Kudos go out to my fellow conspirator and Typospherian, Kevin Kittle, for his behind-the-scenes organizing, and for creating this poster.

Labels: ,

Tuesday, October 17, 2017

Typing Assignment No.11


We had great participation in Assignment 10, which was open to any subject, including some typewriter art and poetry. For this next assignment we'll be writing on the subject of Halloween. It could be from any angle: history, personal accounts, fiction, even anti-Halloween. Whatever.

Have your assignment done and the link posted to the comments in this blog article, or the YouTube video, by Sunday, October 29. Alternatively, email the image as an attachment, to: jvcabacus@yahoo.com. Please ensure the photo image of your typewritten sheet is clear and easily readable, and that the link to the image is publicly accessible.

Going forward, I will continue this two week interval with assignments, hoping it will give you more time to complete without a mad rush at the very last.

If you have any suggestions for future assignment topics, let me know; I'm always open to new ideas. Happy writing!

Labels:

Monday, October 09, 2017

The Strip Mall Jesus and First Church of Perpetual Video

P1110320a
Typecast007

Post-Script: Inspiration for this short-short story, my submission for Typing Assignment No. 10, was from remnants of a dream I'd had, last week. It seems I've have episodic dreams over the years, set in the same or similar environs, that evolves over time as my life experience and employment changes. The dream I'm certain was based on a TV repair shop I'd worked in, decades ago, in a nearby strip mall, at the corner of Eubank and Menaul Blvds here in Albuquerque. While the owner of the shop wasn't exactly a messiah-type, mixed in this dream is also something to do with small storefront churches I've been in over the years.

Typed on my aunt's repaired-as-good-as-it's-gonna-get Royal 10, now situated on my office desk and ready to deliver back to Colorado, when I have the time and the weather cooperates.

How about you? Do you get inspired to write creatively from dreams? Perhaps this is another topic for the Typewriter Video Series. Hmm...

Labels: , , , , , , ,

Sunday, October 08, 2017

Report from Rio Grande Insurgency Contingent

Thursday, October 05, 2017

Typing Assignment No.10


Here we are, already at our tenth typing assignment. It's been a fun project for me, and I hope also for you. The first few assignments seemed obvious, but as the series progressed, I wisely fell upon the resources of my imaginative wife, who has assisted me in some of these latter subjects.

Thinking it over, it seemed the right time to do a free-form assignment: participants can write a one-pager on whatever they want. Some people were late to the party and missed previous assignment deadlines - for them, this is an opportunity to post their already completed work. For others, you've perhaps been working on your own project, and could use this time to share your progress. Whatever the reason, I hope you enjoy this open "un-assignment" typing assignment.

As with previous assignments, post the link to a publicly-accessible image of your typed piece in one of three ways: 1) In the comments section below; 2) In the comments to the accompanying YouTube video (see above); or 3) Email me the image as an attachment, to: jvcabacus@yahoo.com

The deadline for this assignment will be Sunday, October 15. Have fun. I look forward to reading your work.

Labels:

Sunday, October 01, 2017

Thoughts After Seeing California Typewriter

DSCF5400
California Typewriter001 California Typewriter002

Post-Script: I experienced one of those rare moments when, stepping outside the theater into the late-day's sunset, I beheld the New Mexico vista spread before me in that golden light, with thoughts from the film still bouncing around inside my head. Upon returning home I immediately brought this old but wonderfully functional 1930 Underwood Portable out into the front patio and proceeded to write as spontaneous of a movie review as I could manage, only finishing after dark to the light of an oil lamp.

There were four people in the theater for this showing, including my wife and I. This is not so much a comment on the film itself as it is on movie-going in general, in the year 2017, with all the other entertainment diversions to choose from. I understand people want to be entertained, want a distraction from their ordinary lives, which popular movies often provide. But this offering, while marketed as a documentary, I feel is more cerebral than most films since, as I indicate in the typecast, it's not as much about typewriters (which it also is) as it is about our relationship with technology; and a relationship that's constantly changing. It takes some thinking to get the gist of, which is perhaps not what people go to movies for. Maybe it takes too much effort to appreciate; but appreciate it I did.

Every criticism I'd read ahead of time about the film - the length, the lack of graphics introducing characters' names, the supposed lack of a unifying theme - I discounted before the film was half over. It doesn't take a student of film criticism to understand that superficial elements are often symbolic of deeper truths. The Eagles' song Hotel California, as I indicate in the typecast, isn't about the west coast hospitality industry; the song's title is a vehicle to something richer. Pink Floyd's The Wall album isn't about the masonry and construction industry, but symbolic of something deeper: the inner walls we erect. Similarly, California Typewriter isn't just about the superficial story of a struggling repair shop in 2017, but has undertones addressing the deeper issues of societal impact from technological change, and our relationship with changing technology over time, and the role of personal creativity. I liked it, and feel all the better for seeing it. I hope you do, too.

Labels: ,